
Step 3: Configure your basic account settings
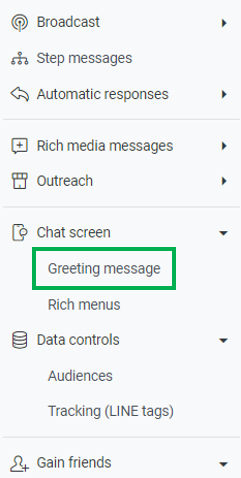
Greeting message
Greeting messages are messages that are automatically sent when a user adds the account as a friend or unblocks the account. Emoji and images can also be used in these messages.
-
Log in to the account and select Chat screen > Greeting message.
-
Create your message, then click Save changes.
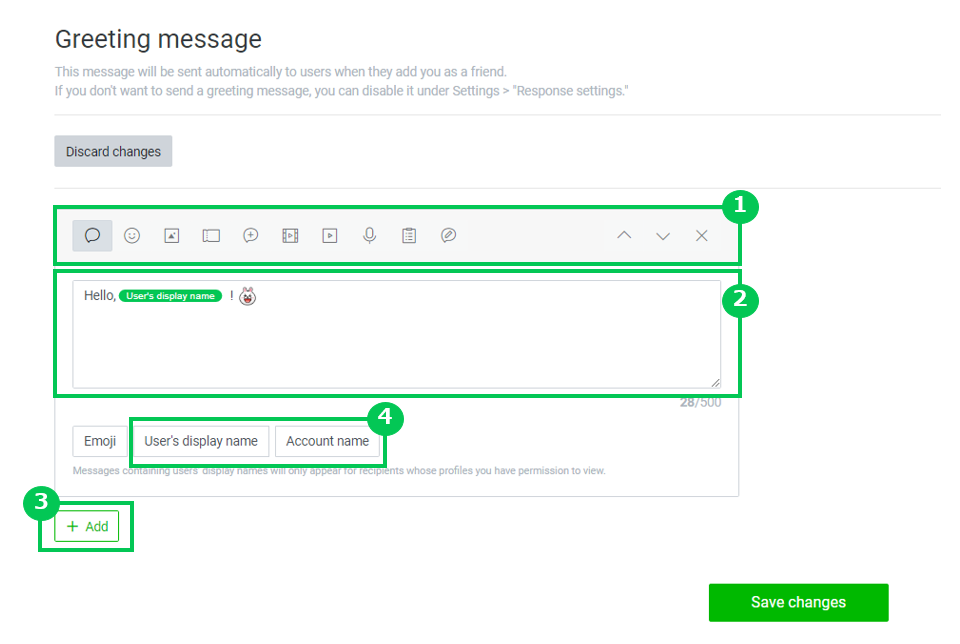

You can choose a message type. For icon details, hover your cursor above the icon.

Enter your message here.

Click to add up to 5 speech balloons.
Note: We recommend using no more than 3.
Click these options to have your friends' display name and your account appear in the message. Your friends' names will replace the User display name section in the message and your account name will appear as the Account name.
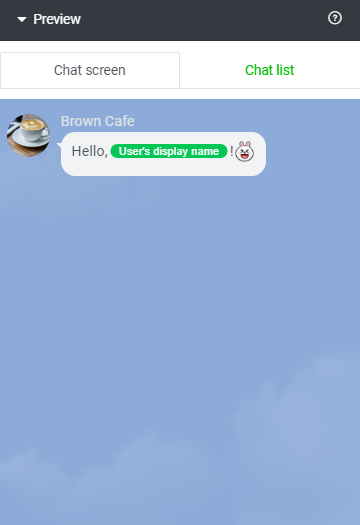
You can see a preview of how users will see the message.
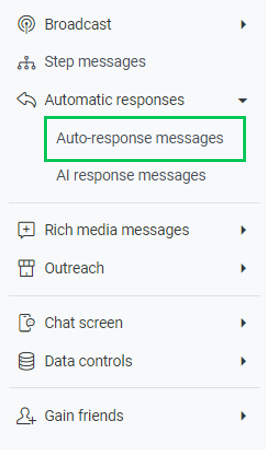
Auto-response messages
Auto-response messages are messages that are automatically sent when a user talks to you in your chat.
You can set multiple auto-response messages that will be sent out randomly, but you can also set them to be used at specific periods and times.
-
Click Automatic responses > Auto-response messages.
-
Click New message at the top right of the screen.

-
Create your message, then click Save changes. Saved messages can be managed from the auto-response message list.
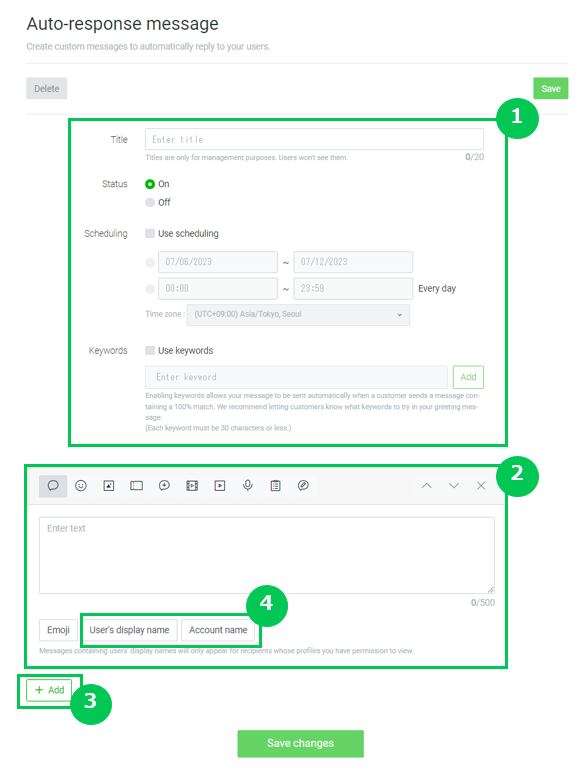
Configures auto-response messages. You can set a title, status, schedule, and keyword reply. Titles are not displayed to users.
Enter your message here.
Click to add a speech balloon.
Click these options to have your friends' display name and your account appear in the message. Your friends' names will replace the User display name section in the message and your account name will appear as the Account name.
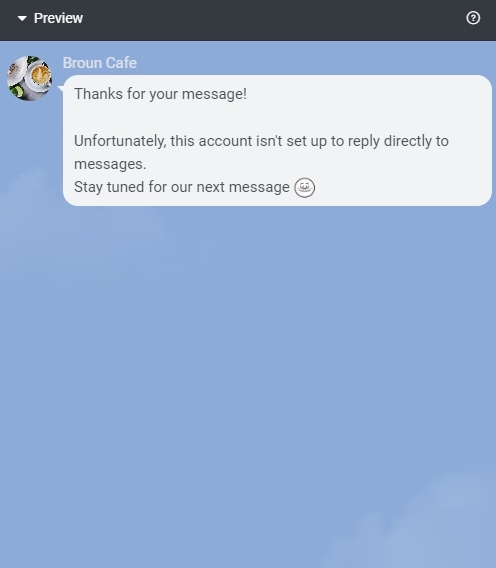
You can see a preview of how users will see the message.
Account settings
-
Configure basic information that will be displayed on LINE.
Click Settings at the top right of the account.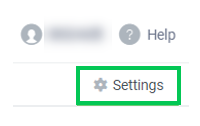
Click Account settings and go to the account settings page.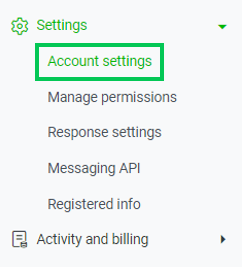
-
Set each item.
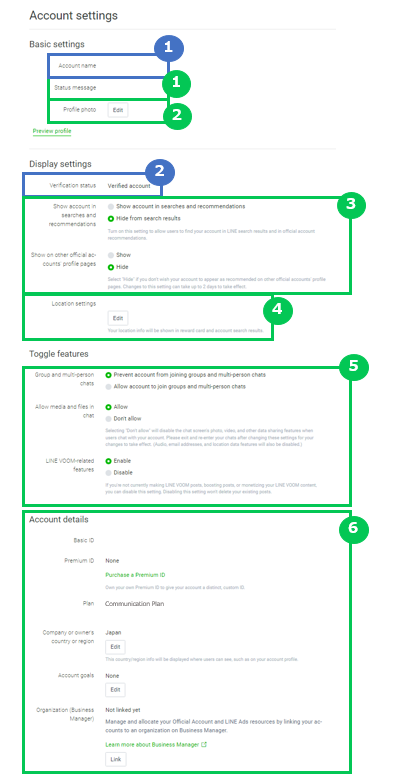
You can set the message that is displayed underneath your account name.
Note: Status messages can be changed once an hour.You can change the icon image. (Size: 640x640 pixels)
Note: Icons can be changed once an hour.Set whether or not to Show account in searches and recommendations and whether or not to Show on other official accounts' profile pages. If you set it to Show, the account will appear under the selected item.
Note: Don't change this setting until you are ready to show your account.Regarding Show account in searches.

1 The criteria for appearing in the rankings is not disclosed.
2 Displayed if reward cards or coupons are within their valid periods and have account location information set.
You can set location information for shops, etc.

You can configure settings for features related to chats and LINE VOOM.

Your account and company information are displayed.

If you have an unverified account, you can freely change your account name.
Note: Unverified accounts are accounts registered through LINE for Business or the LINE Official Account app.

You can change your status by going to the account verification request page. Only an administrator can apply for verification.
Greeting message
Greeting messages are messages that are automatically sent when a user adds the account as a friend or unblocks the account. Emoji and images can also be used in these messages.
-
Log in to the account and select Greeting message.
-
Go to the compose screen and select Templates or Add at the top right of the screen.
If you want to make a new Greeting message, select the format you want to use on the below screen.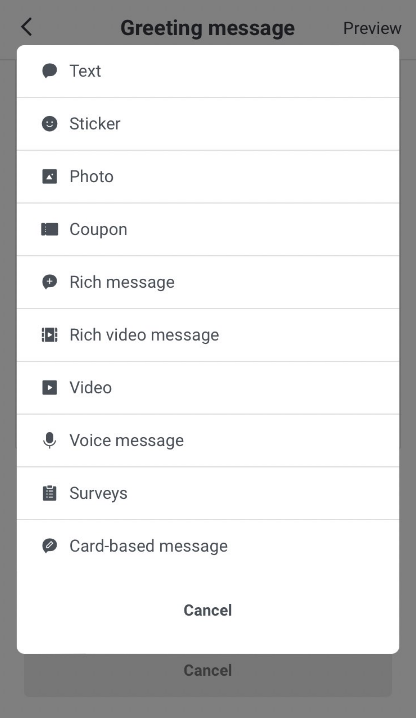
-
Edit the format you chose, then select Save.
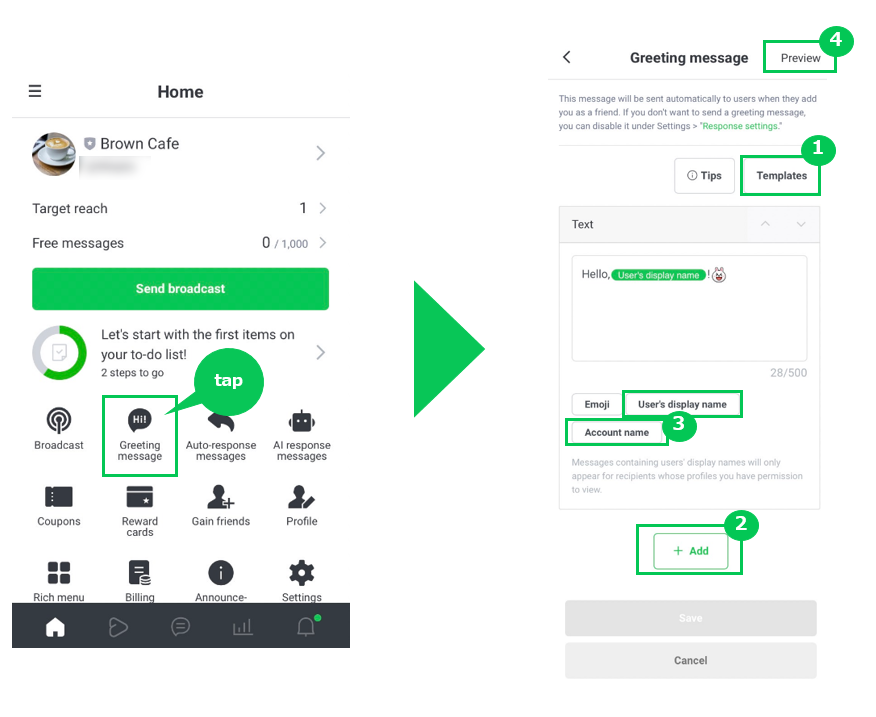
You can make messages from templates.
If you won't be using a template, tap Add to create a message.
Tap these options to have your friends' display name and your account appear in the message. Your friends' names will replace the User display name section in the message and your account name will appear as the Account name.
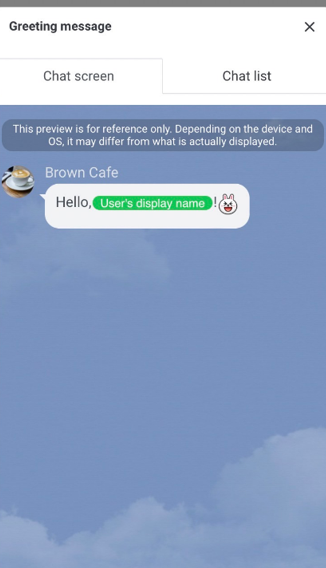
You can see a preview showing what the message will look like from the point of view of users.
Auto-response messages
Auto-response messages are messages that are automatically sent when a user talks to you in your chat.
You can set multiple auto-response messages that will be sent out randomly, but you can also set them to be used at specific periods and times.
-
Select Auto-response messages on the Home tab.
-
Go to the Compose screen. If you want to use something other than Default, select Create new message at the bottom of the screen.
Select the format you want to use for the Greeting message.
-
Edit the format you chose and then select Next.
-
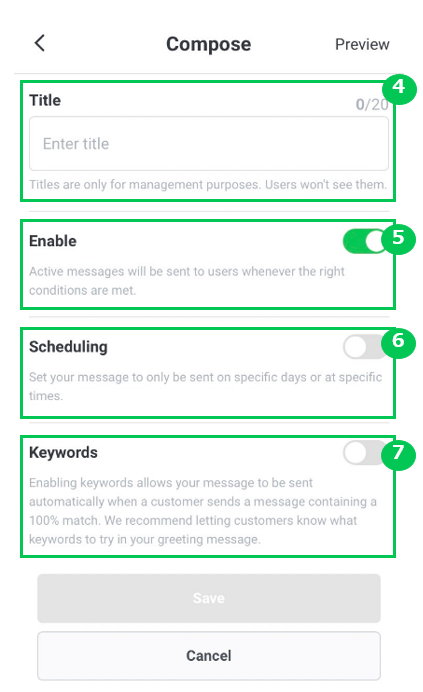
Set each item. You can set a title, status, schedule, and keyword reply. Titles are not displayed to users. Select Save after setting it.
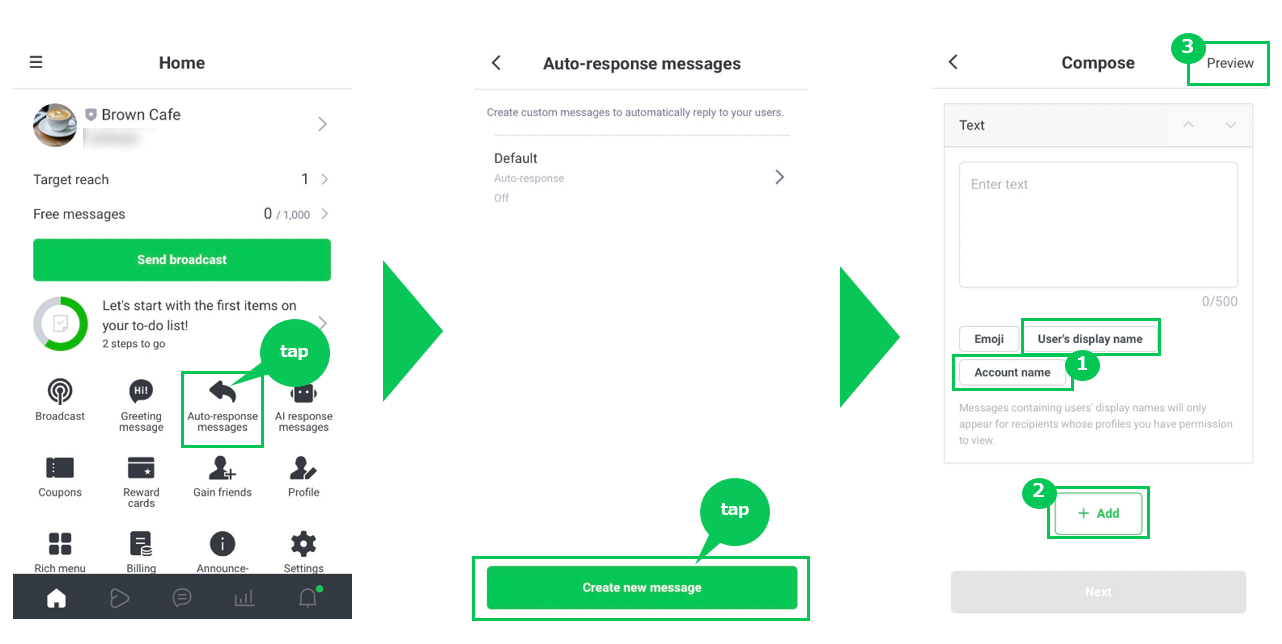
Tap and a friend's display name will be filled in at the User's display name section of the message, and your account name will appear at Account name.
You can add a speech balloon.
You can see a preview of how users will see the message.
You can set a title for the purpose of managing your auto-response messages. (This title is not shown to users.)
You can set a status for the auto-response message. It can be changed later from the list. If the status is set to inactive, the message will not be sent to users regardless of the date/time.
You can set dates, times, and time zones for auto-response messages. If you've set a schedule for auto-response messages, they will only be sent to users during those set times. However, if auto-response messages are set as inactive, they will not be sent, even during set periods.

Go to the keyword settings screen. After entering a keyword, select Apply.
Creating another keyword after applying one will let you set multiple keywords.
Note:
- Use rich messages/rich video messages to send photos and videos that you don't want users to be able to save or store in Keep.
- Please be aware that rich video messages are stored on the server for approximately two months.
- A random message will be sent from your auto-response messages (in their active period and with no time set) that have no keywords set.
If a message matches the conditions of a keyword, the keyword will have the highest priority.
Account settings
-
Configure basic information that will be displayed on LINE. Select the Home tab > Settings > Account on the Account settings page.
-
Set each item.
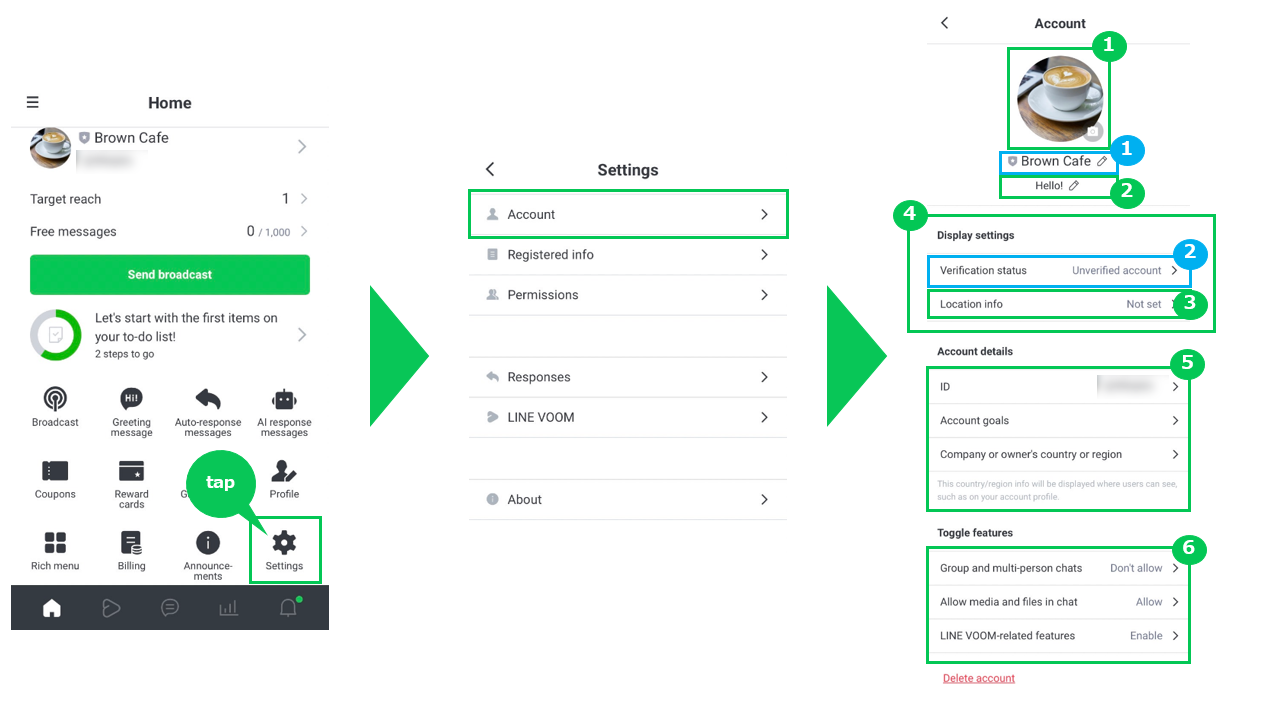
Change the icon image. (Size: 640x640 pixels)
Note: Icons can be changed once an hour.If you have an unverified account, you can freely change your account name.
You can set the message that is displayed underneath your account name.
Note: Status messages can be changed once an hour.You can change your status by going to the account verification request page. Only an administrator can apply for verification.
You can set location information. This is displayed in places like your account and reward card search results.
With Verified and Premium accounts, you can choose Show account in searches under Display settings.
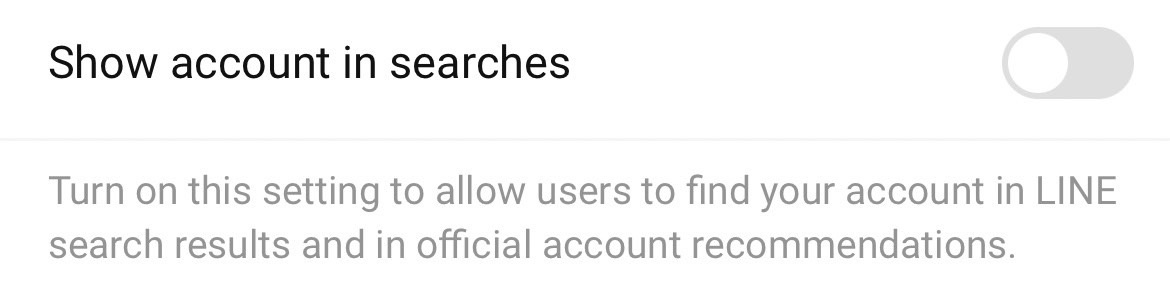
Regarding Show account in searches.
1 The criteria for appearing in the rankings is not disclosed.
2 Displayed if reward cards or coupons are within their valid periods and have account location information set.
Displays information related to the account. This can only be edited by an administrator.
You can configure settings for features related to chats and LINE VOOM.